Before you start. This setup is not for most public-facing services. It fits small internal services inside a company, where you need authentication and authorization quickly and the rules are simple: “this group with this scope may call these methods”. If your rules depend on the data, for example “only the author may edit this document” or “managers see the salaries of their own team”, put that logic in the application. The mesh only sees who calls which method, never the data.
The problem
Every company I worked with has the same picture after a few years. There are 20, 50, 200 internal services. Some of them are big, most of them are small: a service that starts a backfill of a data pipeline, one that changes the retention of a Kafka topic, an API that returns the usage records of a subscriber, a small tool for the NOC team to check the status of a SIM card or a cell site.
Each of them needs to answer the same two questions:
- Who is calling me? A person, another service, or somebody who should not be here at all?
- Is this caller allowed to do this?
And each team answers them in its own way. One service checks a JWT with a library from 2019. Another one has a static API key in an environment variable, shared by five other services and never rotated. A third one has no checks at all, because “it is internal”. After some time nobody can say who can talk to whom.
What I want instead:
- A clear picture of who talks to whom. Service-to-service calls should be allowed explicitly, not by accident.
- No static tokens. Services prove who they are with certificates the platform issues and rotates. Users bring short-lived tokens from the identity provider.
- Permissions that are easy to change. Giving a group access to one more method should be one line in a file and a review, not a release of three services.
- One portal for many services. People should be able to work with all these services from one internal web UI, with their own identity, and see a clear “no” where they have no access.
- New services get all of this for free. A developer writes the service with the API library that is standard in the company, deploys it, adds the rules for its methods, and that is it. No auth code, no auth library, no questions in the platform channel.
The last point is the one that matters most. The best auth code is the one your team did not have to write.
The idea
Take authentication and simple authorization out of the services and put them into the platform:
- Istio gives every pod an identity (mTLS with SPIFFE IDs) and checks user JWTs before the request reaches the application.
- OPA (Open Policy Agent) decides if the call is allowed. Istio asks it
for every request with the
ext_authzintegration. - Authentik is the identity provider. It issues the tokens and knows the users, groups and scopes. Any OIDC provider works the same way: Keycloak, Entra ID, Okta.
- ConnectRPC is the API library for the services.
The service itself only implements its API. It does not parse tokens and it does not know about scopes.
Why ConnectRPC
Honestly, I just like it. You describe the API once in protobuf and generate the server and the clients for every language you need: Go, Python, TypeScript, Java. No OpenAPI spec that drifts away from the code, no hand-written client for each team.
It also fits this approach very well. Every method is a plain HTTP POST to a path that is the full method name:
POST /orders.v1.OrdersService/SubmitOrder
Content-Type: application/json
Authorization: Bearer eyJhbGciOi...

{"id": "0ee7fd541eb810cf"}
So the policy does not need to understand your URL design. It looks at one string and knows exactly which method is called. And errors have a standard JSON shape, which helps later when OPA has to deny a request in a way the client understands.
If you do not want generated code somewhere, you can still call it with
plain JSON. The Python web app in the example does exactly that with
httpx and a few pydantic models.
The example
The code is on GitHub: d-helios/blog-samples/keep-auth-out-of-your-services. It runs on a local kind cluster with one command.
There are three services:
- orders (Go):
GetOrder,CreateOrder,SubmitOrder. - inventory (Go):
GetStock,Reserve,Commit,Recalculate. - web (Python, NiceGUI): a small UI that logs you in and calls
orders.
The business flow is a classic one with two roles. A buyer creates an order.
An approver submits it. When an order is created, orders reserves stock in
inventory. When it is submitted, orders commits the reservation.
Recalculate is an internal maintenance call that orders makes after every
reservation. No user should ever call it directly.
The users:
| User | Group | Scopes | Role |
|---|---|---|---|
| alice | MyServiceRole | ReadOnly | viewer |
| bob | MyServiceRole | ReadWrite | buyer |
| dave | MyServiceRole | ReadOnly, Submit | approver |
| carol | none | all three | outsider |
Carol is there to show that scopes alone are not enough. She has every scope but she is not in the group, so she gets nothing.
Here is how everything is connected:

The browser only has a session cookie. The web app keeps the tokens on the
server side and sends the user’s access token to orders. Every pod in the
mesh has a sidecar. On orders and inventory the sidecar does two things
before the request reaches the application: it verifies the JWT, then it asks
OPA if the call is allowed.
Step 1: every workload has an identity
The first thing is mTLS between all pods, in strict mode:
apiVersion: security.istio.io/v1
kind: PeerAuthentication
metadata:
  name: default
  namespace: demo
spec:
  mtls:
    mode: STRICT
Now every connection inside the namespace is encrypted, and every caller has a verifiable identity based on its Kubernetes service account:
spiffe://cluster.local/ns/demo/sa/ordersThis identity is what replaces static API keys between services. Nobody has
to create it, store it or rotate it. Istio does that. If orders calls
inventory, the sidecar on inventory knows for sure that the call came
from a pod running as the orders service account.
Step 2: users get tokens with the right scopes
Users log in at Authentik. The web app uses the Authorization Code flow with PKCE, as a confidential client. The tokens stay on the server. The browser never sees them.
The access token is a JWT. The interesting part of it for us looks like this:
{
  "iss": "http://auth.localtest.me/",
  "aud": "demo-web",
  "preferred_username": "dave",
  "groups": ["MyServiceRole"],
  "scope": "ReadOnly Submit openid profile email offline_access"
}
One detail about Authentik that surprised me. If a client asks for a scope, Authentik puts it into the token, no matter who the user is. So I wrote a small scope mapping that keeps only the API scopes the user really has. They are stored as a user attribute:
api_scopes = {"ReadOnly", "ReadWrite", "Submit"}
granted = set(request.user.attributes.get("scopes", []))
kept = [s for s in sorted(token.scope) if s not in api_scopes or s in granted]
return {"scope": " ".join(kept)}
In a real company you would probably map scopes from groups in your directory. The point is the same: the token says what the user may do, and the identity provider is the only place where you change it.
I also bound the application to the MyServiceRole group in Authentik.
Carol cannot even log in, she gets “Permission denied” from Authentik. The
mesh still checks the group on every call. That protects you from tokens
issued to another application, and from people who were removed from the
group but still have a valid token for a few minutes.
Step 3: the sidecar verifies the token
A RequestAuthentication tells the sidecars how to validate tokens:
apiVersion: security.istio.io/v1
kind: RequestAuthentication
metadata:
  name: authentik
  namespace: demo
spec:
  jwtRules:
    - issuer: "http://auth.localtest.me/"
      jwksUri: "http://authentik-server.authentik.svc.cluster.local/application/o/demo-web/jwks/"
      audiences: [demo-web, demo-cli]
      forwardOriginalToken: true
The sidecar checks the signature against Authentik’s public keys, the issuer, the audience and the expiry. A request with a broken or expired token stops here with 401 and never reaches OPA or the application.
Two things to know:
- A request without a token passes this step. That is on purpose.
Some calls do not need a user,
Recalculatefor example. Whether a token is required is decided in the next step. forwardOriginalToken: truekeeps theAuthorizationheader on the request. Without it, Istio removes the header after validation, and the service cannot pass the token to the next service.
Step 4: OPA decides
One AuthorizationPolicy per protected workload sends every request to OPA:
apiVersion: security.istio.io/v1
kind: AuthorizationPolicy
metadata:
  name: orders-opa
  namespace: demo
spec:
  selector:
    matchLabels:
      app: orders
  action: CUSTOM
  provider:
    name: opa
  rules:
    - {}
The opa provider is registered once in the Istio mesh config. It points
to the OPA service in the cluster.
The rules themselves are data, not code. This is policies/data.json:
{
  "group": "MyServiceRole",
  "rules": {
    "/orders.v1.OrdersService/GetOrder":          { "any_scope": ["ReadOnly", "ReadWrite"] },
    "/orders.v1.OrdersService/CreateOrder":       { "any_scope": ["ReadWrite"] },
    "/orders.v1.OrdersService/SubmitOrder":       { "any_scope": ["Submit"] },
    "/inventory.v1.InventoryService/GetStock":    { "any_scope": ["ReadOnly", "ReadWrite"] },
    "/inventory.v1.InventoryService/Reserve":     { "any_scope": ["ReadWrite"] },
    "/inventory.v1.InventoryService/Commit":      { "any_scope": ["Submit"] },
    "/inventory.v1.InventoryService/Recalculate": { "callers": ["spiffe://cluster.local/ns/demo/sa/orders"] }
  }
}
This file is the whole permission model. You can read it in one minute, and you can review a change to it in a pull request like any other change.
There are two kinds of rules:
any_scope: a user call. The caller needs a token, must be in the group and must have one of the listed scopes.callers: a service call. Only the listed mesh identities may call it, with or without a user token.
Everything that is not in the file is denied.
The policy in Rego is small. The core of it:
procedure := input.attributes.request.http.path

rule := data.rules[procedure]

caller := input.attributes.source.principal

decision := "allow" if caller in rule.callers

decision := "unauthenticated" if {
	rule.any_scope
	not claims
}

decision := "allow" if {
	rule.any_scope
	user_allowed
}

user_allowed if {
	data.group in object.get(claims, "groups", [])
	some scope in rule.any_scope
	scope in scopes
}
Note that OPA only decodes the token, it does not verify it. The sidecar did that one step before, and a request with a bad token never gets here.
When OPA denies a call, it returns a body in the ConnectRPC error format:
{"code": "permission_denied", "message": "bob may not call /orders.v1.OrdersService/SubmitOrder"}So the client gets a normal Connect error with status 403 and code
permission_denied, the same as if the service had denied it itself. No
Envoy error page, no special handling in clients.
One request, end to end
Here is what happens when dave submits an order:

websendsSubmitOrderwith dave’s token.- The sidecar of
ordersverifies the token. - The sidecar asks OPA. OPA sees the path, dave’s groups and scopes, and
the caller identity (
.../sa/web). Dave hasSubmit, so OPA allows it. ordersruns its own logic: does the order exist, is it still a draft?orderscallsinventory.Commitand forwards dave’s token.- The sidecar of
inventoryverifies the token again and asks OPA again, this time forCommit.
The forwarding is the important part. inventory does not trust orders
just because the call comes from the orders pod. It checks the user behind
the call. If orders had a bug and tried to commit stock on behalf of bob,
inventory would say no, because bob does not have Submit.
So a pod with the orders identity that calls inventory.Commit with bob’s
token gets 403. With no token at all it gets 401. Only with dave’s token it
works.
Forwarding the token is the only auth-related thing the service does, and it is three lines:
func forward(from, to http.Header, keys ...string) {
	for _, k := range keys {
		if v := from.Get(k); v != "" {
			to.Set(k, v)
		}
	}
}
commit := connect.NewRequest(&inventoryv1.CommitRequest{OrderId: order.Id})
forward(req.Header(), commit.Header(), "Authorization", rpc.RequestIDHeader)For Recalculate, orders forwards only the request ID, not the token.
This call is allowed on the orders identity alone, and a user token would
not help anyway: even dave gets 403 if he calls Recalculate directly.
The service still knows who called
People often ask: if the service does not parse the token, how does it know who did what? For audit logs you want to see “order submitted by dave”.
OPA solves this too. When it allows a request, it adds a header with the verified username:
result := {"allowed": true, "headers": {"x-auth-subject": subject}} if decision == "allow"For service calls, the subject is the SPIFFE ID of the caller. Envoy
replaces this header, it does not append to it. So if a client sends
X-Auth-Subject: dave with bob’s token, the service still sees bob.
The service logs it and never makes decisions on it:
{"msg":"order created","order_id":"4b2eebe8a652be77","by":"bob"}
{"msg":"order submitted","order_id":"0ee7fd541eb810cf","by":"dave"}
{"msg":"reservation committed","order_id":"0ee7fd541eb810cf","by":"dave"}
The last line is from inventory. It shows that the forwarded token reached
it and was checked there.
Authorization runs before your code
This has a side effect that is easy to miss. OPA decides on the method and the token. It never sees the order. So:
bob  -> SubmitOrder {"id": "does-not-exist"}  -> 403 permission_denied
dave -> SubmitOrder {"id": "does-not-exist"}  -> 404 not_found
Bob is stopped before orders runs, so he cannot even find out if an order
exists. Dave passes the check, and orders tells him the order is not
there. Usually this is what you want. But it also shows the limit of this
approach: every decision that needs the order itself has to happen in the
service.
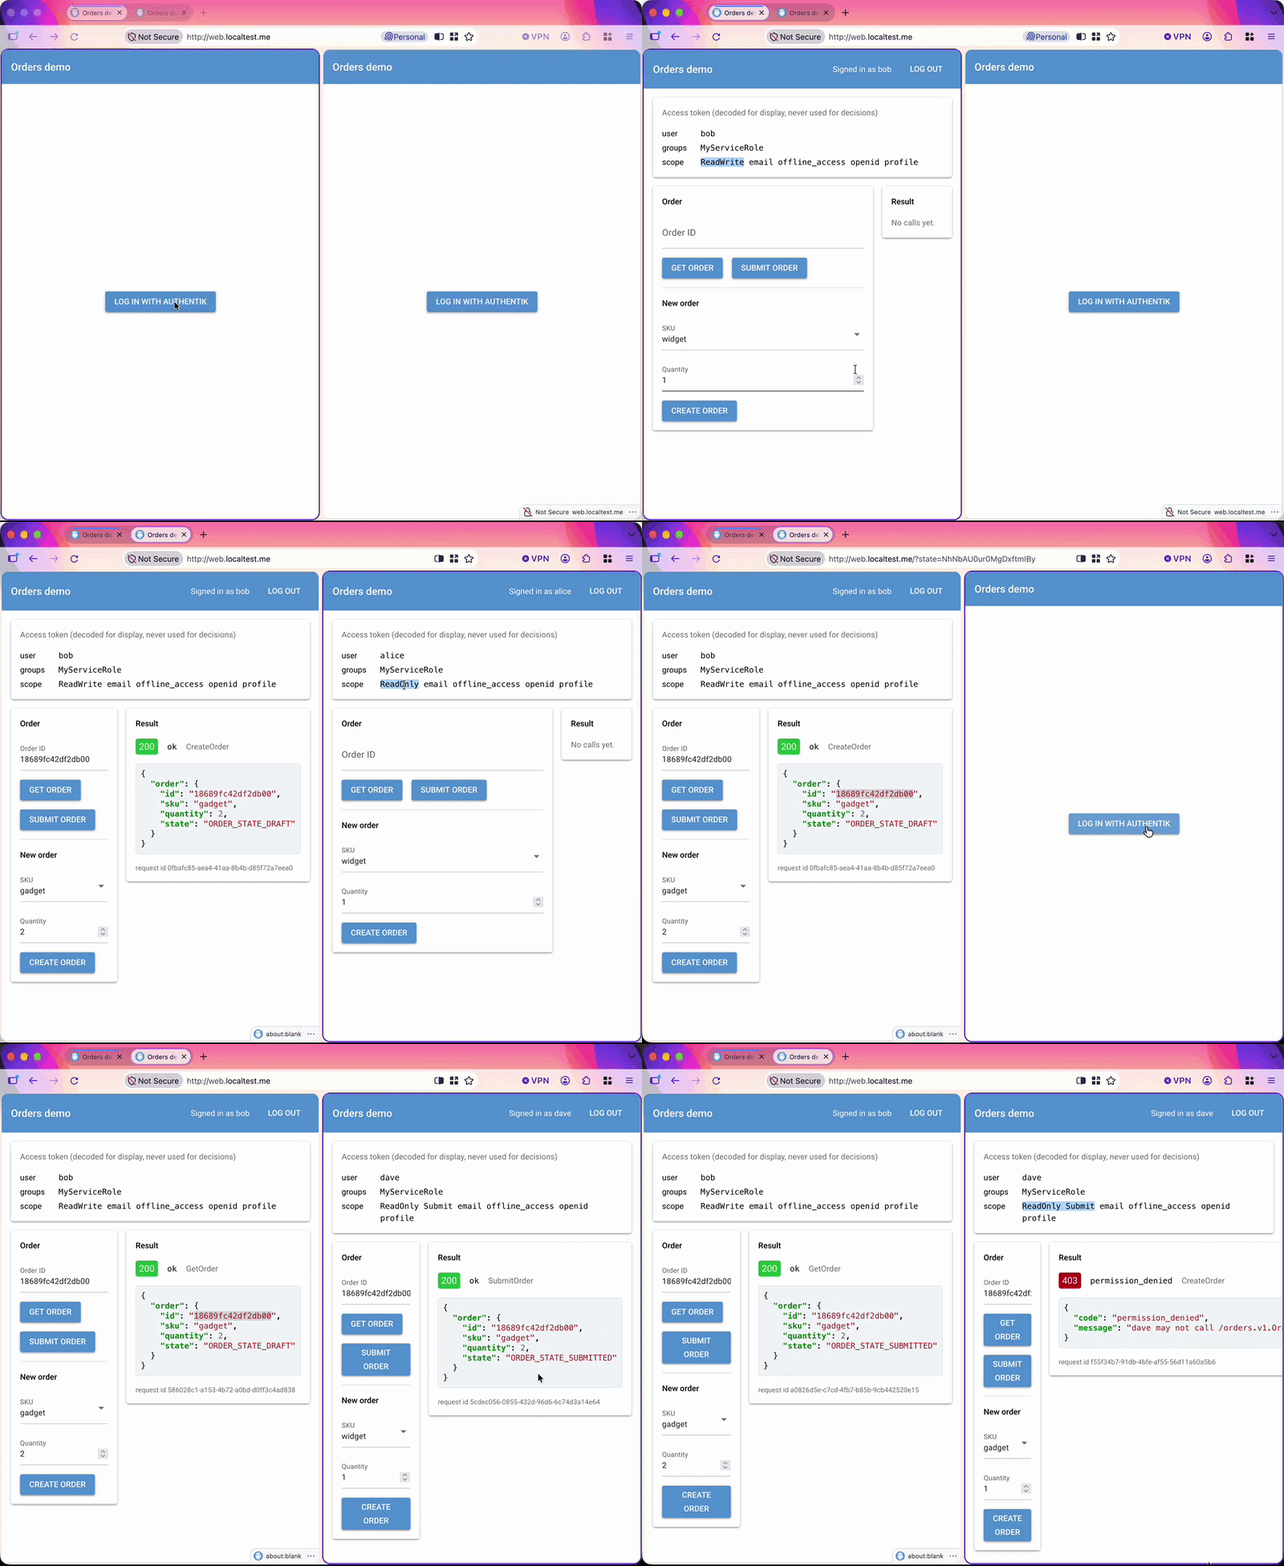
The web UI in the example has all buttons enabled for every user. It does not try to guess what you may do. It sends the call and shows the status code, the Connect error code and the body. Bob can click “Submit order” as often as he wants, he gets 403 every time.
Adding a new service
This is the part that makes the approach worth it. Say a team builds a new
invoices service. What do they do?
- Write the service with ConnectRPC. No auth code.
- Deploy it into the mesh namespace with its own service account.
- Add the
invoicesworkload to the list of protected workloads. - Add one line per method to
data.json:
"/invoices.v1.InvoicesService/ListInvoices": { "any_scope": ["ReadOnly"] },
"/invoices.v1.InvoicesService/SendInvoice":  { "callers": ["spiffe://cluster.local/ns/demo/sa/orders"] }
That’s it. Token validation, group checks, service-to-service rules, denied
calls with proper error codes and audit headers come from the platform.
If the team forgets to add a method to data.json, the method is denied.
That is a safe default: you notice it on the first call in the test
environment, not after an incident.
One portal for many services
This is the part I like most in practice. Because every service accepts the same user token and checks it on its own, one internal web UI can work with all of them as the logged-in user.
The portal does not need a service account with admin rights everywhere. It does not need its own copy of the permission rules to decide which buttons to show. It sends the user’s token, and each service along the way answers for itself. If you can see usage records but not start a backfill, the portal shows the usage records and a clear 403 on the backfill button.
Adding a new service to the portal is just a new page that calls a new
API. Moving from one service to the next in the UI, or one service calling
three others behind the scenes, works the same way for every user, and every
hop checks the same token. For the user it feels like one system. For the
platform team it is still many small services, each with its own rules in
data.json.
Things that bit me
Some practical notes from building this.
JWKS fetch at startup. By default, istiod fetches the identity
provider’s public keys and pushes them to the sidecars. If the identity
provider starts after istiod, the fetch fails and the sidecars reject every
token until the next refresh, which can take 20 minutes. Setting
PILOT_JWT_ENABLE_REMOTE_JWKS=envoy makes each sidecar fetch the keys
itself and retry. The JWKS URL then has to point to a Kubernetes service
the mesh knows, not to an external hostname.
One issuer for everybody. The iss claim must be the same for tokens
that the browser flow gets and for tokens other clients get. If the browser
talks to localhost:9000 and pods talk to authentik.authentik.svc, you
end up with two issuers and some ugly workarounds. I used
*.localtest.me names for the browser and a CoreDNS rewrite inside the
cluster, so both sides use http://auth.localtest.me.
Do not log tokens. OPA decision logs contain the full input by default,
which includes the Authorization header. A small mask rule removes it:
package system.log

mask contains "/input/attributes/request/http/headers/authorization"
Keep OPA close. In the example OPA is one deployment for the whole namespace. That is fine for a demo, but every request now depends on it. In production run it as a sidecar next to each workload, or at least run several replicas and decide if you fail open or closed when it is down.
Try it
The full example, with the Authentik blueprint, Helm charts and policies, is
in the
blog-samples repository.
task up starts everything on a local kind cluster. Every user there has the
password demo-password.